DIY Last Minute Halloween Make-Up
have to admit, I am totally last minute when it comes to Halloween. In case you are a slacker like me, I found quick and simple Halloween make-up tutorials courtesy of Sephora that I wanted to share. These are easy to follow and will add some “drama for yo mamma” on the scariest night of the year! I love the Skull look…very creepy. (Check out even more looks, including the ultra-cool and somewhat sexy Zombie tutorial here.) Happy Haunting….
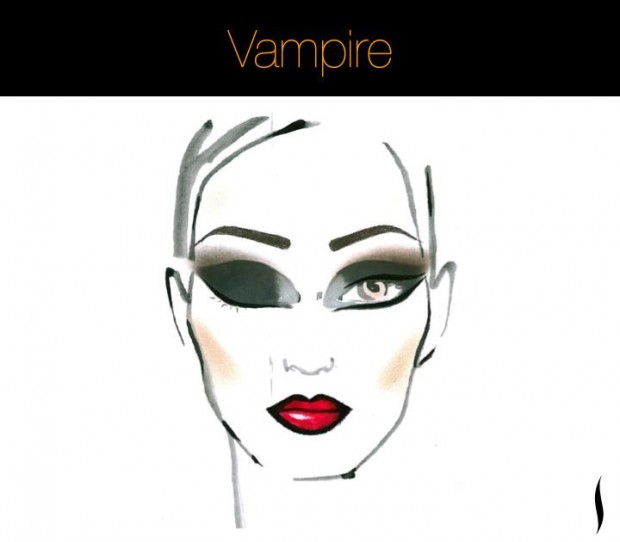
Complexion:
• Apply a liquid foundation 2-3 shades lighter than your natural skin tone with a foundation brush.
Eyes:
• Using short sketch like strokes, trace around the entire eye with non-waterproof black eyeliner dragging it out to create a dramatic wing in the outer corner of the eye.
• Sweep silver eye shadow onto the tear duct and inner portion of the eye.
Lips & Cheeks:
• Apply a bright, bold red lipstick starting at the center of the lips and working outward to fill them in. Dot lipstick on cheekbones.
Complexion:
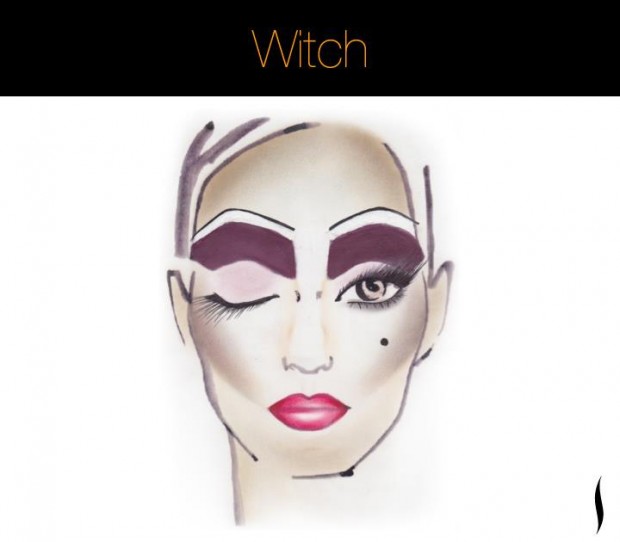
• Choose a tinted moisturizer that matches the skin tone
• Mix with green creme pigment until desired shade is achieved
• Apply all over the face including ears, neck, and decollete.
Eyes:
• Pink shadow in the center of eye to the lash line
• Purple eyeliner to create a crease using your natural eyebrow as a guideline
• Set with purple eyeshadow on top
• Create a new brow by using a cream eyeliner with an angled liner brush
Lips & Cheeks:
• For contour, mix grey and purple pigment
• Place color under cheek bones to create sharp angular contour
• Outline with a brick red on the outer corner and fill in with a true red
• Finish with lipstick in a pressing motion at the center of the lip
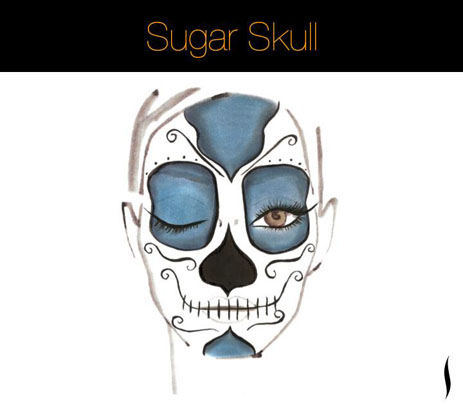
Complexion & Eyes:
• Create and cut out a stencil for the forehead, chine, nose and eyes. Place the stencils on your face one-by-one and trace around them using a black eye pencil.
• Fill in the forehead, chin and eye areas with a layer of blue and set using a loose powder.
• Define by applying black eyeliner in the waterline.
• Smudge a purple shadow under the bottom lash line.
• Finish with mascara.
• Fill in the nose area with a black cream liner (a waterproof product is recommended). Make sure that no flesh tone is visible.
• Fill the entire face outside of the stenciled areas using a small makeup brush and white cream product. Set with a white or iridescent powder.
Lips & Cheeks:
• Trace smile lines from the corners of each side of the month with a black waterproof pencil.
• Using a black cream liner and starting in the center of the lips, draw short vertical lines to represent teeth.
• Besides the line in the center, you should draw approximately 5 vertical lines on each side for a total of 11 vertical lines.
Adornment:
• Press the shimmery product on using a synthetic brush or fingertip.
• Draw curl designs on each cheek, each side of the jawline, and on each side of the forehead with a black cream liner.
• Draw dots around the top of each eye stencil with black pencil or cream liner.
Complexion:
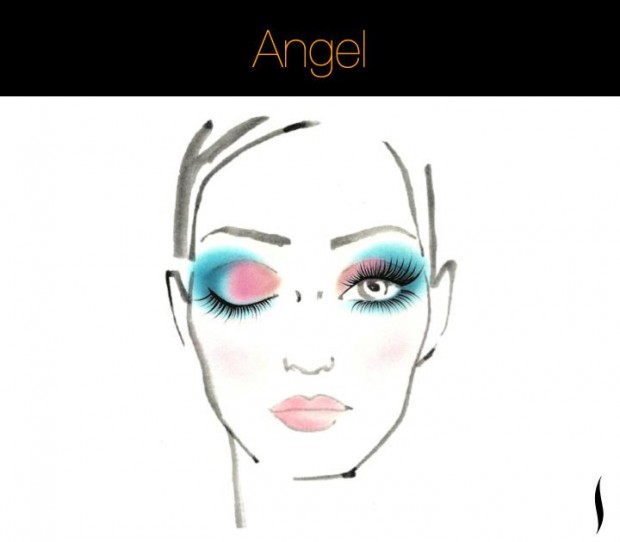
• To get a halo glow apply your foundation with a bit of shimmer mixed in.
• Apply a shimmer on top of cheekbones sweeping up above the brow bone using a fan brush to build glimmer.
Eyes:
• Start with a basic tri-color eye—you can use any colors but we recommend silver, purple, and blue.
• To build out the shape to a round halo effect around the eye use a blending brush in circular motions blending out the intensity on the outer eye area.
Lips & Cheeks:
• Line the lips with a light color and blend into the center of the lip.
• On the lip apply any light pink or nude color of your choice preferably with a pearlescent finish.
• Add a light pink blush to the apples of the cheek.
Adornment:
• You may want to add lashes with feathers, sparkle or individuals to the center of the eye to give a wide-eyed effect.

